Tactical Combat: Difference between revisions
Created page with "__TOC__ =Tactical Combat= These rules let you resolve combat using counters or figures on a hexagonal grid. They assume you have already mastered the combat system in Chap..." |
mNo edit summary |
||
| Line 50: | Line 50: | ||
=Movement in Tactical Combat= | =Movement in Tactical Combat= | ||
In tactical combat, movement is measured more precisely, on a hex-by-hex basis, and a fighter's ''facing'' becomes very important. | |||
{{sidebar}} | |||
===The "Step" in Tactical Combat=== | |||
Some maneuvers, such as [[Attack]] or [[Ready]], allow you to take your usual step in any direction (see [[Step]]). Each yard of step – usually one yard, for humans – equals one hex of movement. You may change facing freely before or after you move. | |||
</div> | |||
[[Image:Movement_and_Facing-01.png]]<br clear="all" /> | |||
''In these diagrams, a red arrow indicates a figure and its facing. A yellow arrow indicates movement.'' | |||
===Movement Points=== | |||
An easy way to keep track of move- | |||
ment is to assume that a [[Move]] or [[Move and Attack]] maneuver gives you a number of "movement points" equal to your Move score; e.g., Move 5 would give you 5 movement points to use during a Move or Move and Attack. An [[All-Out Attack]] or [[All-Out Defense]] (Increased Dodge) maneuver gives half as many movement points, rounded up; e.g., Move 5 would give 3 movement points during these maneuvers. | |||
==Movement and Facing== | |||
Movement and facing interact when you move as part of a [[Move]], [[Move and Attack]], [[All-Out Attack]], or [[All-Out Defense (Increased Dodge)]] maneuver. | |||
===Forward Movement and Facing=== | |||
It costs ''one'' movement point to enter each hex when moving forward. A "forward" move is a move into one of your three front hexes. If you go straight ahead, your facing will not change; otherwise it will change by one hex-side: you must ''turn to face the hex'' as you enter it (see illustration above). | |||
{{ | Thus, you can change direction while moving "forward." Three consecutive hexes of "forward" movement let you run in a half-circle and end up facing the opposite direction (see illustration below). | ||
<br clear="all" />[[Image:Movement_and_Facing-02.png]]<br clear="all" /> | |||
''In these diagrams, a red arrow indicates a figure and its facing. A yellow arrow indicates movement.'' | |||
===Backward and Sideways Movement and Facing=== | |||
If you take a [[Move]], [[Move and Attack]], or [[All-Out Defense (Increased Dodge)]] – but not an [[All-Out Attack]] – and don't want to move forward, you can move backward (A) or sideways (B), keeping the ''same'' facing (see the illustration below). Each sideways or backward hex costs ''two'' movement points. | |||
You can also "sidestep" into a ''front'' hex (C) while keeping your original facing. This ''is'' allowed during an All-Out attack (as well as on a Move, etc.). It also costs ''two'' movement points. | |||
<br clear="all" />[[Image:Movement_and_Facing-03.png]]<br clear="all" /> | |||
''In these diagrams, a red arrow indicates a figure and its facing. A yellow arrow indicates movement.'' | |||
===Facing Changes and Movement=== | |||
At the end of your turn, if you took a [[Move]] or [[Move and Attack]] maneuver and used no more than ''half'' of your movement points – or if you chose the All-Out Defense (Increased Dodge) maneuver – you may turn to face in any direction. | |||
If you took a [[Move]] or [[Move and Attack]] and used ''more than half'' of your movement points, you may change your facing by ''one hex-side''. | |||
You may also change facing ''before'' or ''during'' your movement on a [[Move]], [[Move and Attack]], or [[All-Out Defense (Increased Dodge)]] maneuver, but this costs movement points. Each hex-side of facing change counts as one yard of movement; e.g., turning 180° costs three movement points. | |||
=Attacking in Tactical Combat= | |||
{{sidebar}} | |||
===Long Weapon Tactics=== | |||
The Attack maneuver lets you step before or after you attack. Stepping after you attack in melee combat can give you the upper hand if your weapon has more reach than your opponent's. Suppose you have a spear and your adversary has a broadsword. You could attack from two hexes away and then step back, ending your turn ''three'' hexes from your foe. Since his weapon has a one-hex reach, he could not reach you with an [[Attack]], as the Attack maneuver limits him to a one-yard step (of course, a foe with [[Move]] 11 or higher could step farther). To strike back, he would have to take an [[All-Out Attack]] or a [[Move and Attack]] ... either of which would restrict his defenses, leaving him open to your next attack! And even if he does get close enough to attack, you can always retreat when you defend... | |||
</div> | |||
Attacks work as described in [[Combat|Chapter 11]], with the difference that a hex grid permits precise determination of range, facing, arc of vision, and area of effect. This calls for a few extra rules – especially for combat in the same hex as your foe (see [[Close Combat]]). | |||
==Melee Attacks== | |||
Normally, you can only attack into your front hexes. The ''distance'' at which you can attack depends on your weapon's "reach." | |||
===Reach of a Weapon=== | |||
A melee weapon's "reach," as given on the [[Melee Weapons|Melee Weapon Table]], defines the hexes into which you can attack with it, as follows: | |||
''Reach C ("Close"):'' You can strike only at targets in your own hex. | |||
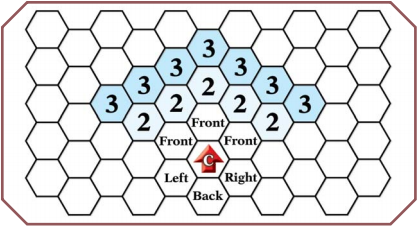
''Reach 1 (1 yard):'' You can strike into any hex marked "Front" in the diagram below. | |||
''Reach 2 (2 yards):'' You can strike into any hex marked "2" in the diagram below. | |||
''Reach 3 (3 yards):'' You can strike into any hex marked "3" in the diagram below. | |||
<br clear="all" />[[Image:Reach_of_a_Weapon.png]]<br clear="all" /> | |||
Most melee weapons have a one-yard reach, and can hit only your three front hexes. | |||
Some weapons have more than one reach. For instance, a knife can slash at "close" and one-yard reach. With a spear, you can have a reach of either one or two yards, depending on how you hold it. Larger pole weapons can have a reach of one, two, or three yards! | |||
Most weapons with a reach of two or more yards require a [[Ready]] maneuver to "change grips" and go from one reach to another. For instance, if you are holding a [[halberd]] with a grip that lets you strike three hexes away, you have to ready it for one turn before you can use it to strike someone one or two hexes away. A few balanced weapons (e.g., the [[greatsword]] and [[quarterstaff]]) let you attack at more than one reach without taking a Ready maneuver. The [[Melee Weapons|Melee Weapon Table]] shows which weapons require a grip change and which do not. | |||
Note that if you're very large, your reach will increase – see [[Size Modifier and Reach]]. | |||
===Attacking Through an Occupied Hex=== | |||
You can attack "through" someone else in melee if you are using a weapon with a reach of two yards or more. You may attack through a friend at no penalty (this is a basic part of your training with any long weapon). If you attack through an enemy's hex, the penalty is -4. If your attack passes along a line between two hexes, there is no penalty unless both hexes are occupied. If they are, treat the situation as a single occupied hex – friendly, unless foes occupy both hexes. | |||
===Wild Swings=== | |||
A Wild Swing is a melee attack against a foe to your side (left or right) or back, or against a foe you can't see. It's unlikely to hit, but sometimes it's better than nothing. | |||
A Wild Swing is at -5 to hit or the current visibility penalty, whichever is worse, and your effective skill cannot exceed 9 after all modifiers. You cannot target a particular part of the foe's body; if using hit locations, roll randomly. | |||
A Wild Swing need not be a swing – it could be a thrust. However, you cannot make a "wild thrust" at a distance of more than one yard. | |||
You ''can'' combine a Wild Swing with an [[All-Out Attack]], but you may ''not'' choose the "Determined" option to get +4 to hit to offset the Wild Swing penalty. You can also make a Wild Swing during a [[Move and Attack]]; use the more severe penalties of the two. If you have [[Peripheral Vision]], two-handed melee attacks into your right and left hexes, and one-handed attacks to the same side (e.g., right hand to right hex), are not Wild Swings. However, one-handed attacks to the ''opposite'' side (e.g., right hand to ''left'' hex), and attacks on foes behind you, are still Wild Swings. | |||
If you have [[360° Vision]], no attack to your sides or back is a Wild Swing – but attacks to the back and opposite side at -2 due to the clumsy angle of attack. | |||
Note that some martial-arts techniques (e.g., [[Back Kick]]) allow you to attack foes behind you without making a Wild Swing. | |||
==Ranged Attacks== | |||
Ranged combat on a hex grid also | |||
requires a few additional rules. | |||
===Arc of Vision=== | |||
If you have a ranged weapon, you can attack into any of the white hexes in the diagram below. If you have [[Peripheral Vision]], you can attack into any of the white or gray hexes. And if you have [[360° Vision]], you can attack into any of the white, gray, or black hexes. In all three cases, the hexes you can attack into define your "arc of vision." | |||
<br clear="all" />[[Image:Arc_of_Vision.png]]<br clear="all" /> | |||
===Shooting Blind=== | |||
If you have a ranged weapon, you may attack someone outside your arc of vision – or in total darkness, or while blinded – by "shooting blind." Use the rules for [[Wild Swings]] (above), but the penalty is -10 and your effective skill cannot exceed 9 after all modifiers. (As Murphy's Law predicts, you are often less likely to hit your target than anyone else in the vicinity; see [[Hitting the Wrong Target]], below.) Needless to say, you cannot take the [[Aim]] maneuver! | |||
===Firing Through an Occupied Hex=== | |||
You can target an enemy if you can draw a straight line between any part of your hex and any part of his without passing through a solid obstacle. Use a straightedge (such as a ruler) to determine this. However, if your chosen straight line passes through an occupied hex, the occupants of that hex are "in the way." You may hit them if you miss your intended target – see [[Hitting the Wrong Target]], below. | |||
Anyone in the way (friend or foe) gives you a -4 penalty. If your attack passes through several occupied hexes, apply this penalty for each person in the way! | |||
If your attack passes along a line between two hexes, there is no penalty unless both hexes are occupied. If they are, treat it as a single hex penalty (-4). Someone lying down is never "in the way" unless you, too, are on the ground. Someone kneeling or sitting is not in the way unless ''either'' you or your target is also kneeling or sitting. | |||
These rules assume human-sized or smaller combatants. A fighter with a [[Size Modifier]] 2 or more greater than yours (''3'' or more if he's kneeling or has the [[Horizontal]] disadvantage, ''4'' or more if he's prone) completely blocks your line of sight – you can't shoot past him – unless you're higher up. | |||
===Hitting the Wrong Target=== | |||
If you attack with a ranged weapon and miss, you may hit someone else. You must check for this if you fail your attack roll. | |||
You may hit ''anyone'' – friend or foe – if he was in your line of fire. To determine this, check the line along which you attacked. Any hex this line passes through is "in the way." | |||
Combatants who are kneeling or lying down are not in the way unless you, too, are at their level. | |||
Because hitting the wrong target is a matter of pure chance, your attack roll against each possible target is the same: a flat 9 ''or'' the number you would have had to roll to hit him on purpose, whichever is ''worse''. | |||
[[Category:Rules]] | [[Category:Rules]] | ||
[[Category:Combat]] | [[Category:Combat]] | ||
Revision as of 07:03, 13 January 2014
Tactical Combat
These rules let you resolve combat using counters or figures on a hexagonal grid. They assume you have already mastered the combat system in Chapter 11, and cover only the exceptions and special cases that arise when using that system on a map.
Figures
You need a marker or miniature figure to represent each combatant. This can be metal, plastic ... even cardboard. These rules assume one-inch hexes, or a 50mm scale, for maps – but 25mm figures are easier to handle. Of course, you need not use figures! Any counter will do, as long as it has a "front" to indicate facing and some way to show when the fighter it represents is prone.
Gamers who want the fun of detailed figures at the cost of cardboard counters should consider Cardboard Heroes, SJ Games' line of upright cardboard figures.
The Combat Map
Tactical combat uses a "combat map" marked off in hexagons, or hexes. Each one-inch hex on the map represents an area one yard across. At the start of combat, pick a suitable map, typically one you have drawn on a blank sheet of hexagon paper.
Hexes
One hex on the combat map represents one yard of distance. It is also the basic unit of movement: each hex a fighter moves represents one yard of movement. The number of hexes you can move on your turn depends on your Move score and your maneuver (see Maneuvers in Tactical Combat).
Each human-sized or smaller fighter must occupy one hex. Exceptions include close combat (see Close Combat), swarms (see Swarm Attacks), and situations in which people are crowded together but not fighting (you could cram up to four ordinary-sized humans into a single hex, if they were friendly).
A human-sized fighter who is lying down or who has the Horizontal disadvantage occupies two hexes; see Change Posture (below). Larger fighters also occupy more than one hex; see Multi-Hex Figures.
Treat a fractional hex (e.g., one cut in half by a wall) as if it were a full hex: you can move through it and occupy it without penalty, unless the GM rules otherwise. You can also move through an ally's hex, although the movement cost is higher. You cannot move through or occupy a hex completely filled by a solid barrier (e.g., a pillar).
Facing
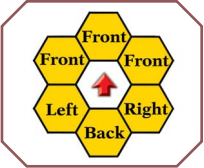
You must "face" toward one of the six hexes adjacent to your hex at all times. Your facing defines your front, right, left, and back hexes (see illustration).
Your front hexes are the hexes you can see into and easily move into. You can move into any adjacent hex – but sideways and backward movement is slower.
For a right-handed fighter, the right side is the "weapon side" and the left side is the "shield side." For a left-handed fighter, these are reversed.
Maneuvers in Tactical Combat
Tactical combat uses the maneuvers described in Chapter 11 under Maneuvers, but some of these have additional complications on a hex grid. Several of these notes refer to "movement points"; see Movement in Tactical Combat for details.
Move
You receive movement points equal to your Move.
Change Posture
If a human-sized fighter lies prone or has the Horizontal disadvantage, he takes up two hexes. If you lie down or are knocked prone, your lower half occupies the hex you were standing in and your upper half can occupy any adjacent hex. If you get up from a prone posture, you may choose to get up into either of your hexes.
All-Out Attack
You must move first and then attack – not vice versa. You may remain stationary, turn in place, or move forward. If you choose to move forward, you may move up to two hexes or expend movement points equal to half your Move (round up), whichever is more. You may not change facing at the end of your move.
Move and Attack
You receive movement points equal to your Move.
All-Out Defense
If you choose the Increased Dodge option, you may use movement points equal to half your Move (round up).
Ready
You can pick up an item that is in your own hex or any hex within your reach (usually one hex).
Wait
The greater precision of tactical combat on a hex grid allows many more options with this maneuver; see Wait Maneuver Strategy and Opportunity Fire. If you are waiting with a melee weapon, your weapon's reach is crucial: a long weapon lets you strike a charging foe before he can get to you!
Wait Maneuver Strategy
The Wait maneuver can be very useful in a tactical situation where you want to block a fleeing foe – or to protect someone behind you.
If you have taken a Wait maneuver, you can attack at any time – even in the middle of someone else's movement! If you did not move at all on your turn, you may take a step (see The "Step" in Tactical Combat) and then strike. If your foe is still standing after your blow falls, he may continue his movement.
This is the best way (and almost the only way) to keep a faster foe from running past you on a clear field. If you take another maneuver (for instance, to fight with someone else), you are distracted – and, on a one-second time scale, a faster foe should be able to run past you! But if you are waiting for him, you'll have a chance to intercept him, or hit him, as he tries to go by.
Movement in Tactical Combat
In tactical combat, movement is measured more precisely, on a hex-by-hex basis, and a fighter's facing becomes very important.
The "Step" in Tactical Combat
Some maneuvers, such as Attack or Ready, allow you to take your usual step in any direction (see Step). Each yard of step – usually one yard, for humans – equals one hex of movement. You may change facing freely before or after you move.
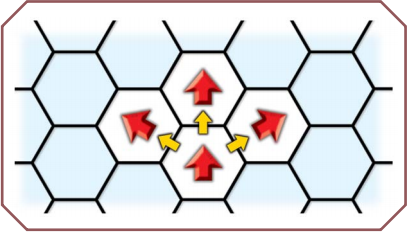
In these diagrams, a red arrow indicates a figure and its facing. A yellow arrow indicates movement.
Movement Points
An easy way to keep track of move- ment is to assume that a Move or Move and Attack maneuver gives you a number of "movement points" equal to your Move score; e.g., Move 5 would give you 5 movement points to use during a Move or Move and Attack. An All-Out Attack or All-Out Defense (Increased Dodge) maneuver gives half as many movement points, rounded up; e.g., Move 5 would give 3 movement points during these maneuvers.
Movement and Facing
Movement and facing interact when you move as part of a Move, Move and Attack, All-Out Attack, or All-Out Defense (Increased Dodge) maneuver.
Forward Movement and Facing
It costs one movement point to enter each hex when moving forward. A "forward" move is a move into one of your three front hexes. If you go straight ahead, your facing will not change; otherwise it will change by one hex-side: you must turn to face the hex as you enter it (see illustration above).
Thus, you can change direction while moving "forward." Three consecutive hexes of "forward" movement let you run in a half-circle and end up facing the opposite direction (see illustration below).
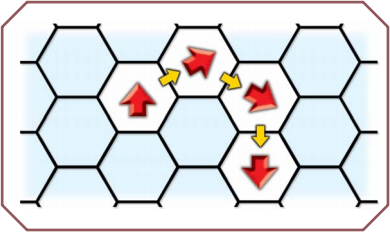
In these diagrams, a red arrow indicates a figure and its facing. A yellow arrow indicates movement.
Backward and Sideways Movement and Facing
If you take a Move, Move and Attack, or All-Out Defense (Increased Dodge) – but not an All-Out Attack – and don't want to move forward, you can move backward (A) or sideways (B), keeping the same facing (see the illustration below). Each sideways or backward hex costs two movement points.
You can also "sidestep" into a front hex (C) while keeping your original facing. This is allowed during an All-Out attack (as well as on a Move, etc.). It also costs two movement points.
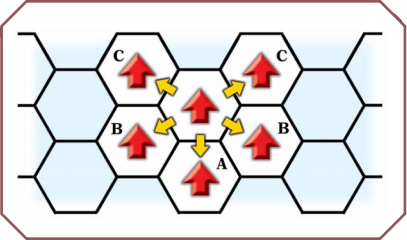
In these diagrams, a red arrow indicates a figure and its facing. A yellow arrow indicates movement.
Facing Changes and Movement
At the end of your turn, if you took a Move or Move and Attack maneuver and used no more than half of your movement points – or if you chose the All-Out Defense (Increased Dodge) maneuver – you may turn to face in any direction.
If you took a Move or Move and Attack and used more than half of your movement points, you may change your facing by one hex-side.
You may also change facing before or during your movement on a Move, Move and Attack, or All-Out Defense (Increased Dodge) maneuver, but this costs movement points. Each hex-side of facing change counts as one yard of movement; e.g., turning 180° costs three movement points.
Attacking in Tactical Combat
Long Weapon Tactics
The Attack maneuver lets you step before or after you attack. Stepping after you attack in melee combat can give you the upper hand if your weapon has more reach than your opponent's. Suppose you have a spear and your adversary has a broadsword. You could attack from two hexes away and then step back, ending your turn three hexes from your foe. Since his weapon has a one-hex reach, he could not reach you with an Attack, as the Attack maneuver limits him to a one-yard step (of course, a foe with Move 11 or higher could step farther). To strike back, he would have to take an All-Out Attack or a Move and Attack ... either of which would restrict his defenses, leaving him open to your next attack! And even if he does get close enough to attack, you can always retreat when you defend...
Attacks work as described in Chapter 11, with the difference that a hex grid permits precise determination of range, facing, arc of vision, and area of effect. This calls for a few extra rules – especially for combat in the same hex as your foe (see Close Combat).
Melee Attacks
Normally, you can only attack into your front hexes. The distance at which you can attack depends on your weapon's "reach."
Reach of a Weapon
A melee weapon's "reach," as given on the Melee Weapon Table, defines the hexes into which you can attack with it, as follows:
Reach C ("Close"): You can strike only at targets in your own hex.
Reach 1 (1 yard): You can strike into any hex marked "Front" in the diagram below.
Reach 2 (2 yards): You can strike into any hex marked "2" in the diagram below.
Reach 3 (3 yards): You can strike into any hex marked "3" in the diagram below.
Most melee weapons have a one-yard reach, and can hit only your three front hexes.
Some weapons have more than one reach. For instance, a knife can slash at "close" and one-yard reach. With a spear, you can have a reach of either one or two yards, depending on how you hold it. Larger pole weapons can have a reach of one, two, or three yards!
Most weapons with a reach of two or more yards require a Ready maneuver to "change grips" and go from one reach to another. For instance, if you are holding a halberd with a grip that lets you strike three hexes away, you have to ready it for one turn before you can use it to strike someone one or two hexes away. A few balanced weapons (e.g., the greatsword and quarterstaff) let you attack at more than one reach without taking a Ready maneuver. The Melee Weapon Table shows which weapons require a grip change and which do not.
Note that if you're very large, your reach will increase – see Size Modifier and Reach.
Attacking Through an Occupied Hex
You can attack "through" someone else in melee if you are using a weapon with a reach of two yards or more. You may attack through a friend at no penalty (this is a basic part of your training with any long weapon). If you attack through an enemy's hex, the penalty is -4. If your attack passes along a line between two hexes, there is no penalty unless both hexes are occupied. If they are, treat the situation as a single occupied hex – friendly, unless foes occupy both hexes.
Wild Swings
A Wild Swing is a melee attack against a foe to your side (left or right) or back, or against a foe you can't see. It's unlikely to hit, but sometimes it's better than nothing.
A Wild Swing is at -5 to hit or the current visibility penalty, whichever is worse, and your effective skill cannot exceed 9 after all modifiers. You cannot target a particular part of the foe's body; if using hit locations, roll randomly.
A Wild Swing need not be a swing – it could be a thrust. However, you cannot make a "wild thrust" at a distance of more than one yard.
You can combine a Wild Swing with an All-Out Attack, but you may not choose the "Determined" option to get +4 to hit to offset the Wild Swing penalty. You can also make a Wild Swing during a Move and Attack; use the more severe penalties of the two. If you have Peripheral Vision, two-handed melee attacks into your right and left hexes, and one-handed attacks to the same side (e.g., right hand to right hex), are not Wild Swings. However, one-handed attacks to the opposite side (e.g., right hand to left hex), and attacks on foes behind you, are still Wild Swings.
If you have 360° Vision, no attack to your sides or back is a Wild Swing – but attacks to the back and opposite side at -2 due to the clumsy angle of attack.
Note that some martial-arts techniques (e.g., Back Kick) allow you to attack foes behind you without making a Wild Swing.
Ranged Attacks
Ranged combat on a hex grid also requires a few additional rules.
Arc of Vision
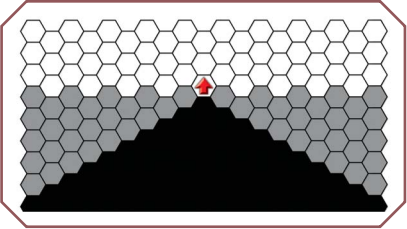
If you have a ranged weapon, you can attack into any of the white hexes in the diagram below. If you have Peripheral Vision, you can attack into any of the white or gray hexes. And if you have 360° Vision, you can attack into any of the white, gray, or black hexes. In all three cases, the hexes you can attack into define your "arc of vision."
Shooting Blind
If you have a ranged weapon, you may attack someone outside your arc of vision – or in total darkness, or while blinded – by "shooting blind." Use the rules for Wild Swings (above), but the penalty is -10 and your effective skill cannot exceed 9 after all modifiers. (As Murphy's Law predicts, you are often less likely to hit your target than anyone else in the vicinity; see Hitting the Wrong Target, below.) Needless to say, you cannot take the Aim maneuver!
Firing Through an Occupied Hex
You can target an enemy if you can draw a straight line between any part of your hex and any part of his without passing through a solid obstacle. Use a straightedge (such as a ruler) to determine this. However, if your chosen straight line passes through an occupied hex, the occupants of that hex are "in the way." You may hit them if you miss your intended target – see Hitting the Wrong Target, below.
Anyone in the way (friend or foe) gives you a -4 penalty. If your attack passes through several occupied hexes, apply this penalty for each person in the way!
If your attack passes along a line between two hexes, there is no penalty unless both hexes are occupied. If they are, treat it as a single hex penalty (-4). Someone lying down is never "in the way" unless you, too, are on the ground. Someone kneeling or sitting is not in the way unless either you or your target is also kneeling or sitting.
These rules assume human-sized or smaller combatants. A fighter with a Size Modifier 2 or more greater than yours (3 or more if he's kneeling or has the Horizontal disadvantage, 4 or more if he's prone) completely blocks your line of sight – you can't shoot past him – unless you're higher up.
Hitting the Wrong Target
If you attack with a ranged weapon and miss, you may hit someone else. You must check for this if you fail your attack roll.
You may hit anyone – friend or foe – if he was in your line of fire. To determine this, check the line along which you attacked. Any hex this line passes through is "in the way."
Combatants who are kneeling or lying down are not in the way unless you, too, are at their level.
Because hitting the wrong target is a matter of pure chance, your attack roll against each possible target is the same: a flat 9 or the number you would have had to roll to hit him on purpose, whichever is worse.
