Tactical Combat
Tactical Combat
These rules let you resolve combat using counters or figures on a hexagonal grid. They assume you have already mastered the combat system in Chapter 11, and cover only the exceptions and special cases that arise when using that system on a map.
Figures
You need a marker or miniature figure to represent each combatant. This can be metal, plastic ... even cardboard. These rules assume one-inch hexes, or a 50mm scale, for maps – but 25mm figures are easier to handle. Of course, you need not use figures! Any counter will do, as long as it has a "front" to indicate facing and some way to show when the fighter it represents is prone.
Gamers who want the fun of detailed figures at the cost of cardboard counters should consider Cardboard Heroes, SJ Games' line of upright cardboard figures.
The Combat Map
Tactical combat uses a "combat map" marked off in hexagons, or hexes. Each one-inch hex on the map represents an area one yard across. At the start of combat, pick a suitable map, typically one you have drawn on a blank sheet of hexagon paper.
Hexes
One hex on the combat map represents one yard of distance. It is also the basic unit of movement: each hex a fighter moves represents one yard of movement. The number of hexes you can move on your turn depends on your Move score and your maneuver (see Maneuvers in Tactical Combat).
Each human-sized or smaller fighter must occupy one hex. Exceptions include close combat (see Close Combat), swarms (see Swarm Attacks), and situations in which people are crowded together but not fighting (you could cram up to four ordinary-sized humans into a single hex, if they were friendly).
A human-sized fighter who is lying down or who has the Horizontal disadvantage occupies two hexes; see Change Posture (below). Larger fighters also occupy more than one hex; see Multi-Hex Figures.
Treat a fractional hex (e.g., one cut in half by a wall) as if it were a full hex: you can move through it and occupy it without penalty, unless the GM rules otherwise. You can also move through an ally's hex, although the movement cost is higher. You cannot move through or occupy a hex completely filled by a solid barrier (e.g., a pillar).
Facing

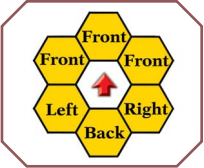
You must "face" toward one of the six hexes adjacent to your hex at all times. Your facing defines your front, right, left, and back hexes (see illustration).
Your front hexes are the hexes you can see into and easily move into. You can move into any adjacent hex – but sideways and backward movement is slower.
For a right-handed fighter, the right side is the "weapon side" and the left side is the "shield side." For a left-handed fighter, these are reversed.
Maneuvers in Tactical Combat
Tactical combat uses the maneuvers described in Chapter 11 under Maneuvers, but some of these have additional complications on a hex grid. Several of these notes refer to "movement points"; see Movement in Tactical Combat for details.
Move
You receive movement points equal to your Move.
Change Posture
If a human-sized fighter lies prone or has the Horizontal disadvantage, he takes up two hexes. If you lie down or are knocked prone, your lower half occupies the hex you were standing in and your upper half can occupy any adjacent hex. If you get up from a prone posture, you may choose to get up into either of your hexes.
All-Out Attack
You must move first and then attack – not vice versa. You may remain stationary, turn in place, or move forward. If you choose to move forward, you may move up to two hexes or expend movement points equal to half your Move (round up), whichever is more. You may not change facing at the end of your move.
Move and Attack
You receive movement points equal to your Move.
All-Out Defense
If you choose the Increased Dodge option, you may use movement points equal to half your Move (round up).
Ready
You can pick up an item that is in your own hex or any hex within your reach (usually one hex).
Wait
The greater precision of tactical combat on a hex grid allows many more options with this maneuver; see Wait Maneuver Strategy and Opportunity Fire. If you are waiting with a melee weapon, your weapon's reach is crucial: a long weapon lets you strike a charging foe before he can get to you!
Wait Maneuver Strategy
The Wait maneuver can be very useful in a tactical situation where you want to block a fleeing foe – or to protect someone behind you.
If you have taken a Wait maneuver, you can attack at any time – even in the middle of someone else's movement! If you did not move at all on your turn, you may take a step (see The "Step" in Tactical Combat) and then strike. If your foe is still standing after your blow falls, he may continue his movement.
This is the best way (and almost the only way) to keep a faster foe from running past you on a clear field. If you take another maneuver (for instance, to fight with someone else), you are distracted – and, on a one-second time scale, a faster foe should be able to run past you! But if you are waiting for him, you'll have a chance to intercept him, or hit him, as he tries to go by.
Movement in Tactical Combat
TODO
This page has not been finished up!